vSpace Pro Software Clean Re-Install Procedure
About this document
This document will walk you through a reinstallation of vSpace Pro software. Pay attention to hyperlinks to referenced information.
Review before you begin...
1. Installation should take about 15 minutes for experienced users. Allocate more time for first-timers or complex environments.
2. You must have your Management Portal account credentials ready. These should be the same ID and password you use to sign in to the NComputing website and register new servers. You will be using these to download and register your vSpace server.
3. You will reboot your PC at least twice. Once, for the removal of the software, and once for installation. Be sure to plan for this outside of your production environment.
4. Disable firewalls, antivirus and security software. Within a safe environment, you want to make sure that nothing gets on the way of installing vSpace. Support may ask you to remove the antivirus as part of the process of troubleshooting.
5. Backup your server. If your computer hosts sensitive information, have a recovery plan as precaution for unexpected issues.
6. Prepare your AMP subscription licenses beforehand. If you choose to use vSpace Pro Enterprise, if the use of this version is required for your specific situation, or your devices are manufactured before 2015, you will need to purchase your licenses first, then proceed to reinstall. Having your AMP account compliant, makes the process easier for your devices to be enabled to connect through vSpace Pro Enterprise. If you choose to use the alternative vSpace Pro 11, LTS, make sure that you understand the differences of functionality between versions and the limitations of the LTS version.
Process
1. Download vSpace Pro software.
Go to www.ncomputing.com and log in with your personal profile credentials. Then, look for the Download Now blue button under the Support tab. For a detailed process, see this article.
Once the file downloads, keep it handy for a later installation.
2. Unregister your current vSpace Pro server.
Unregister your local vSpace Manager from the Management Portal. This procedure is very important. Please do not omit it. This should be as simple as to open the vSpace Manager application in your PC and look at the top right. Your account name and email will be shown along with a clickable chevron next to these. Click on it and a drop down menu will expand. Click on Unregister. Confirm when prompted.

Did you forget this step or you were not able to it? Go to www.ncomputing.com and log in > Management Portal > My vSpace Installations > vSpace Managers.
Look for your server name and at the far right, you will find a label in red that reads: UNREGISTER. Click on it to remove the registration.
3. Uninstall vSpace Pro.
Use the program uninstaller (within your list of installed programs) or use the traditional way to remove the program: Control Panel > Programs and Features > NComputing vSpace [Right click and click on Uninstall]. 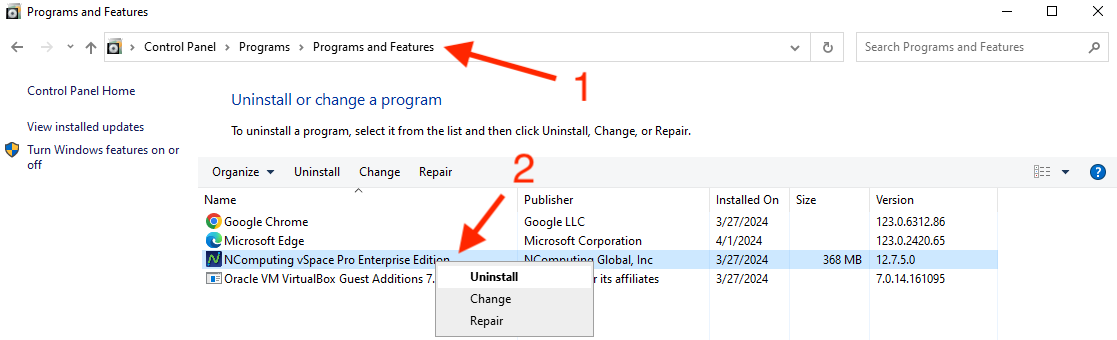

You must reboot when prompted by the wizard.
4. Delete the NComputing Folder.
 If you are concerned about preserving vSpace Console configurations, please read this article: 📗How to Preserve vSpace Console Settings When Reinstalling
 When the computer reboots, navigate to the C:\Program Files, find the NComputing folder and delete it.
5. Install the new vSpace Software

In rare cases, NComputing Support may ask you to install using Command Prompt with Elevated Privileges. We have a reference on this article. (Requires basic knowledge of installation by command line) Otherwise, continue reading for conventional installation procedure.
a) Go to the download location. (typically that will be your Downloads folder)
b) Find the vSpace Software .zip file.
c) Extract the contents by right-clicking the zip folder and selecting Extract All.
You can extract it in the same location, so you can find it quickly. This will create a duplicate, extracted folder. Click on it and find the vSpacePro Installer icon. Double-click on the installer package to start the installation wizard.
Note: The software installation is comprised of 2 parts: vSpace Manager (which brokers licensing and local deployment info) and the vSpace Server Software (vSpace Console app and Session Protocol). Both are needed in your multi user environment, and should be installed together or separately in some instances. Consequently, you will be offered with an option to do an Express or Custom installation.
Express is the best choice for typical instances like If you are only installing a single server and no other vSpace Server can be seeing the local LAN. Both vSpace Manager and Software will be installed together in the server. That way, brokering of licensing and session sharing happens on the same server.
On a different scenario, if you have many servers within the same LAN, is best to do a Custom install. This will enable you install the vSpace Server Software separately and have a selected and unique Broker Server to have the vSpace Manager to perform its natural licensing tasks.
Here are two examples for Custom Installation:
1. Your local deployment is comprised of a few servers and you want the master server (the one that has the vSpace Manager) to provide sessions as well. In such case, do an Express install only on the Broker Server (So both vSpace Manager and vSpace Server Software are together) and do a Custom Installation with will allow you to install only the vSpace Server Software on the other servers. In the example below, you have three computers sharing sessions, but only one is the Broker Server and has the vSpace Manager installed.
2. In environments where you will have many vSpace Servers, it may be best to dedicate a separate Broker Server, per LAN, reserved to have the vSpace Manager performing without sharing any sessions, Then, you will also do a Custom Install and install only the vSpace Manager in your chosen, Broker Server and install only the vSpace Server Software on the rest of the machines.
The rule of thumb here is to remember that you should have only one Broker Server with vSpace Manager on a single LAN, be it a unique server or a cluster of them. A single broker will avoid potential database conflicts due to multiple brokers, trying to manage the data.
Follow the Wizard's prompts until the end.
You must reboot when prompted by the wizard.
6. Essential Configurations.
a) Registration
After reboot, you should see a window dialog from vSpace inviting you to register.
If you do not see this, please, launch the vSpace Manager application and follow the prompts to register online. Use your credentials to register your server to your Management Portal account.
Always select Online Registration. As Off-Line Registration is reserved for special instances only. This is where you are doing a set up where the computer is dedicated to work, always, without internet. More on this subject on this article.
Once the vSpace Manager window appears, information on the server may take a minute or two to populate. Your server will be now listed on the Management Portal as the registration is received.
Note: If you are doing a large deployment and your vSpace Manager resides on another computer in the network you will need to open the vSpace Console and enter the IP of the server where the vSpace Manager resides.
Once you register, the vSpace Manager will appear. if you have AMP, you will have a clear label saying so.
Note: The "Client Licenses" tab is meant to store information of other products. If your AMP subscription is not showing as seen above, likely your licensing is not synchronizing correctly. In such case, please check this article.
b) Make sure the vSpace Console is linked to the vSpace Manager.
Open the vSpace Console App. If you did the "Express Installation", since the vSpace Manager is on the same machine as the vSpace Server software, it will be linked automatically and you will see the vSpace Console homepage.
Click on "Manage Servers" and check on your server Resources and Status. You should see a green dot on each section, meaning that your system is performing well. You can also click on Manage Devices to see your terminals ready to connect.
If you did the "Custom Install" and the vSpace Manager resides in another machine, the vSpace Console will be asking you for the vSpace Manager's location. Enter the IP address of the host where the vSpace Manager resides and the link should be automatic.
c) Update the firmware.
If your thin clients require it, for example: L300, MX100 or RX300 terminals, please update their firmware. We have a number of KB articles written on how to perform the update of the firmware on these units.
For L300, and MX Series thin clients, firmware update, see this article.
For RX300 and RX300+ Series thin clients, firmware update, see this article.
For RX-RDP+, RX420(RDP), RX-440(RDP) EX Series and LEAFOS thin clients firmware update, see this article.
d) Configure your security.
In protected environments, you will need to configure access for ports and executives used by our platform and devices. These are essential configurations to ensure proper communication between clients and server in the production environment, as well as, allowing registration with our services outside of your network security. For reference, check this article.
For additional reference to this guide, here is an additional article.
If you find any anomaly or have questions on this process, please contact your support engineer.
Related Articles
vSpace Pro Installation - Tips, References and Process Detail
Introduction This article provides a comprehensive guide to installing the vSpace Pro platform, including both the Enterprise Edition and the Long-Term Support (LTS) Edition. It also outlines critical pre-deployment recommendations, platform ...How to install vSpace Pro Enterprise in restricted network environment (e.g. offline deployment)?
To deploy vSpace Pro in restricted Internet network environment (e.g. offline environment), it is mandatory to have a minimum of 2 host machines. One host machine (Host A) is used to deploy the vSpace Manager component. A second host machine (Host B) ...How to test drive vSpace Pro Client software.
Introduction The vSpace Pro Client for Windows is a versatile application that enables a PC or laptop to connect to a virtual desktop session hosted by NComputing's vSpace Pro Enterprise Edition. Whether you're evaluating the platform or looking to ...How can I install vSpace Pro 11 LTS?
How can I install vSpace Pro 11 LTS? Go to the NComputing software downloads section to download the software. (if you do not already, You will have to create an account) Quick Installation Guide Detailed Installation Guide, Tips and Best Practices ...What are key benefits of using vSpace Pro 11 LTS
vSpace Pro 11 LTS supports 10 popular Windows™ operating systems, including Windows Server 2016 and Windows 10. If you use Windows, you’ll be right at home. Your users will all have the same familiar Windows desktop experience. Access the Windows ...