Tips for Deploying PMC Endpoint Manager on Azure Cloud (related to Microsoft Defender for Cloud)
Important Notice
If you are using PMC Endpoint Manager version 4.2.1 or newer, this article does not apply to your deployment. Starting with version 4.2.1, PMC has migrated to a Debian 12-based OS and the previously described compatibility issue with Microsoft Defender for Cloud in Azure no longer occurs.
1. Scope
This article applies to PMC deployments in Microsoft Azure that are using versions earlier than 4.2.1 (prior to the Debian 12 base). It provides guidance around the intersection of PMC virtual appliance deployments and Microsoft Defender for Cloud configuration.
2. Deployment on Azure
Starting with PMC version 3.x and higher, PMC can be deployed to Microsoft Azure Cloud as a virtual machine. For PMC 3.x, 4.0.x, and 4.1.x, it is advisable to place the PMC virtual machine in a dedicated Resource Group within your Azure subscription. You can either create a new Resource Group during the VM deployment process or move the PMC VM to a dedicated Resource Group afterward.
3. Microsoft Defender for Cloud Considerations
When PMC is deployed on Azure and the Defender for Cloud option is enabled for the subscription covering the PMC VM, certain issues have been observed (for versions earlier than 4.2.1). Specifically:
-
The Azure Linux Agent (waagent) may attempt to install VM extensions tied to Defender for Cloud.
-
Some of the Microsoft packages installed by those extensions are incompatible with the Debian 11-based PMC appliance (used in versions prior to 4.2.1).
-
These services may log large volumes of messages to the system journal, consuming storage space excessively and potentially leading to system stability or performance problems.
4. Workaround for Affected Versions (pre-4.2.1)
To avoid the potential issues when using PMC versions that are based on Debian 11 or earlier, we recommend applying an Azure Policy to prevent the installation of Defender extensions on the PMC-dedicated VM(s):
Steps:
-
In the Azure Portal, open Policy (search “Policy”).
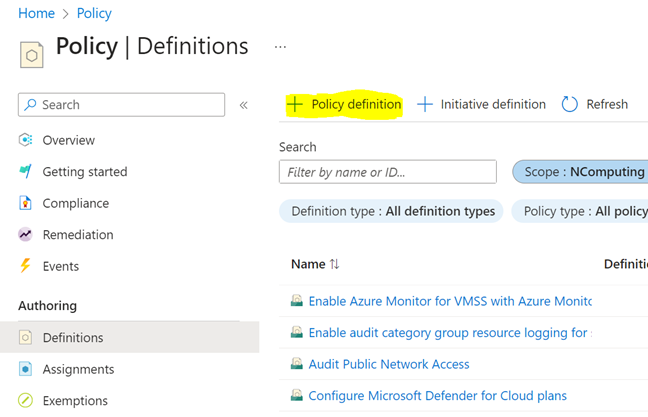
Go to Authoring → Definitions and click + Policy definition.
-
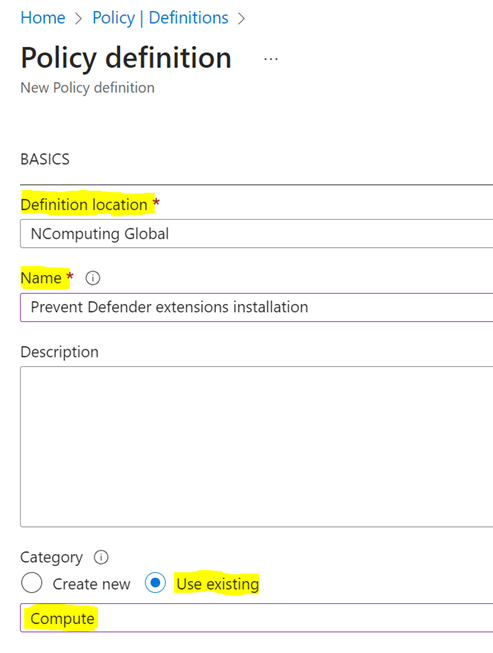
For Definition location, select the subscription covering your PMC VM.
-
Enter a name (for example: Prevent Defender extensions installation).
-
Under Category, select Compute.


Under Policy Rule, paste the following JSON:
-
Save the new Policy definition.
Now assign the policy: go to Authoring → Assignments → Assign policy.
-
Under Scope, choose the subscription and the Resource Group dedicated for your PMC virtual machine(s).
-
Under Policy definition, select the one you just created. Set Enforcement to Enabled.
On the Parameters tab of the assignment, set the Denied extension parameter value to:
-
Review + create to save the policy assignment.
-
Within the Resource Group containing the PMC VM(s), verify under Settings → Policies that the assignment appears.
In the Azure Portal, open Policy (search “Policy”).
Go to Authoring → Definitions and click + Policy definition.
-
For Definition location, select the subscription covering your PMC VM.
-
Enter a name (for example: Prevent Defender extensions installation).
-
Under Category, select Compute.
Under Policy Rule, paste the following JSON:
Save the new Policy definition.
Now assign the policy: go to Authoring → Assignments → Assign policy.
-
Under Scope, choose the subscription and the Resource Group dedicated for your PMC virtual machine(s).
-
Under Policy definition, select the one you just created. Set Enforcement to Enabled.
On the Parameters tab of the assignment, set the Denied extension parameter value to:
Review + create to save the policy assignment.
Within the Resource Group containing the PMC VM(s), verify under Settings → Policies that the assignment appears.
5. Upgrade Recommendation
If you are currently running PMC version prior to 4.2.1, we strongly recommend upgrading to version 4.2.1 or newer. By upgrading, you will benefit from:
-
The switch to a Debian 12-based OS, which resolves the compatibility concern with Defender for Cloud extensions.
-
The fact that the workaround described in Section 4 is no longer required.
-
Improved long-term support and stability for new deployments.
See the release notes for version 4.2.1 for full details.
6. Summary
-
Using PMC 4.2.1 or newer? → This KB article does not apply.
-
Using PMC version earlier than 4.2.1? → Follow the guidance above to prevent Defender for Cloud extension installation on the PMC VM or upgrade to version 4.2.1+.
Related Articles
Perform PMC Endpoint Manager "In-Place" Upgrade in Azure Cloud (related to Microsoft Defender for Cloud)
Important Notice This article applies only to PMC versions earlier than 4.2.1. Starting with PMC version 4.2.1, the platform has migrated to a Debian 12–based OS, which resolves the compatibility issues previously seen with Microsoft Defender for ...[Release Notes] PMC Endpoint Manager
NComputing PMC Endpoint Manager Version 4.2.1 Release Notes PRODUCT RELEASE NOTES: NCOMPUTING PMC ENDPOINT MANAGER, VERSIONS 4.2.1 Product: NComputing PMC Endpoint Manager Version: 4.2.1 Supported virtualization environments: VMware ESXi 6.7.0, ...PMC Version 4, Start Guide
Overview This document based on the release notes of PMC 4.1.1. It covers everything you need to know, in-depth, regarding installation and deployment of PMC. It is always recommended that you use the current release notes of every PMC version that ...Can I install PMC Endpoint Manager on Azure Cloud?
Yes. Starting with PMC Endpoint Manager version 2.7.0, the PMC Linux virtual appliance can be installed and deployed on Microsoft Azure Cloud. Please refer to the PMC Endpoint Manager (2.7.0) Azure Installation guide here for detailed instructions.Updating PMC Virtual Appliance – Process and Best Practices
Overview This article provides a step-by-step guide for updating the PMC Virtual Appliance. Whether your PMC is hosted on-premises or in a cloud environment like Azure, following these instructions will ensure a smooth and secure update process. PMC ...