Install VERDE (rpm) on Centos 7 with NIC Teaming
- Begin installing Centos7
- Configure Network
- Configure static IP addresses for both NICs.
To configure NIC teaming we will use the handy nmcli tool that can be used for the management of NetworkManager service. We have 2 NIC cards that we are going to bond or combine to create a logical team interface: enp0s3 and enp0s8. This may be named differently in your case.
· To confirm the active network interfaces run:
$ nmcli device status
· The output confirms the existence of 2 active network connections. To gather more information * about the interfaces like UUID, run the command:
$ nmcli connection show· To create a network teaming link or interface, which will be our logical link, we are going to delete the existing network interfaces. Thereafter we will create slave interfaces using the deleted interfaces and then associate them with the teaming link.
Using their respective UUID’s execute the commands below to delete the links:
$ nmcli connection delete e3cec54d-e791-4436-8c5f-4a48c134ad29 $ nmcli connection delete dee76b4c-9alb-4f24-a9f0-2c9574747807

This time when you check the interfaces, you’ll notice that they are disconnected and provide no connection
to the server. Basically, your server will be isolated from the rest of the
network.
$ nmcli device status
·
Next, create a team interface
called team0 in active-backup runner mode. The active backup runner mode uses
one active interface and reserves the others for redundancy in case the active
link goes down.
$ nmcli connection add type team con-name team0 ifname team0 config '{"runner": {"name": "activebackup"}}'

To view the attributes assigned to the team0 interface run the command:
$ nmcli connection show team0

team0 interface as shown.
$ nmcli connection show
·
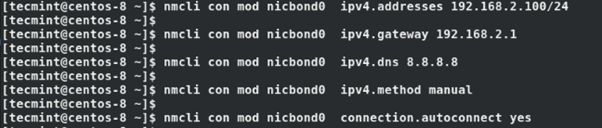
Configure IP address for the team0 interface as shown using the nmcli
command. Be sure to assign the IP’s according to your network’s subnet
& IP addressing scheme.
$ nmcli con mod team0 ipv4.addresses 192.168.2.100/24$ nmcli con mod team0 ipv4.gateway 192.168.2.1$ nmcli con mod team0 ipv4.dns 8.8.8.8$ nmcli con mod team0 ipv4.method manual$ nmcli con mod team0 connection.autoconnect yes
Thereafter, create slave links and associate the slaves to the team link:
· $ nmcli con add type team-slave con-name team0-slave0 ifname enp0s3 master team0
· $ nmcli con add type team-slave con-name team0-slave1 ifname enp0s8 master team0

Check the status of the links again, and you’ll notice that the slave links are now active.
$ nmcli connection show
· Deactivate and activate the team link. This activates the connection between the slave links and the team link.
$ nmcli connection down team0 && nmcli connection up team0

Verify the state of the team link connection as shown.
$ ip addr show dev team0We can see that the link is up with the correct IP addressing that we configured earlier.
To retrieve additional details about the team link, run the command:
$ sudo teamdctl team0 state
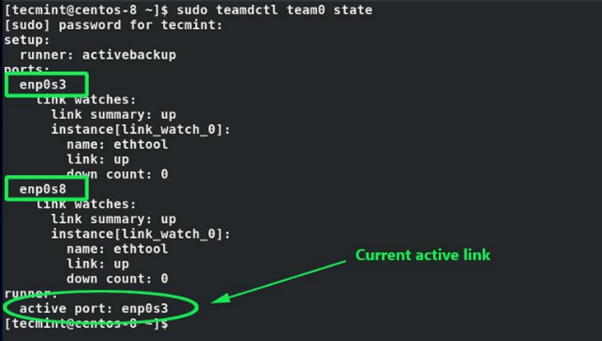
From the output, we can see that both links (enp0s3 and enp0s8) are up and that the active link is enp0s3
To test active-backup teaming mode, we will disconnect the currently active link – enp0s3 – and check whether the other link kicks in.
$ nmcli device disconnect enp0s3$ sudo teamdctl team0 state· To reconnect the disconnected device use below command:
$ nmcli device connect enp0s3
Create the following file via the vi command:
vi /etc/security/limits.d/95-verde.conf
Add the following lines of data:
* - nproc -1
* - nofile 65535
· Manually disable SELinux by editing the file
vi /etc/sysconfig/selinux
Change the following line to:
SELINUX=disabled
· Create the vb-verde user and add it to the root group with the following two lines of commands:
useradd vb-verde
usermod -G root vb-verde
· Run the following Linux updates. One at a time:
yum -y update
yum -y install epel-release
yum -y --enablerepo=updates --enablerepo=base --assumeyes update openssl
yum -y --enablerepo=updates --enablerepo=base --assumeyes install java-1.8.0-openjdk.x86_64
yum -y --enablerepo=updates --enablerepo=base --assumeyes update libpng
yum -y install gtk2
yum -y install zip unzip
yum -y install bridge-utils
yum -y install net-tools
yum -y install genisoimage
yum -y install libogg
yum -y install libvorbis
yum -y install libxkbfile
· Move/copy the VERDE rpm's to the /root directory and run the following command to install
yum --nogpgcheck install *.rpm
· Configure the VERDE installation. You'll need to select the server's function (Option 2 is CM/MD/VDI), provide the IP address that is assigned to team0 interface and various other functional settings by running the following command:
/usr/lib/verde/bin/verde-config -i
· Disable the iptables and access the Management Console:
systemctl stop firewalld
systemctl disable firewalld
Related Articles
Installing Centos7.x for VERDE 8.2.1, 8.2.2(rpm) vGPU, 8.2.2 and 8.2.3+
Product Line: VERDE With the new Centos 7, installation and networking have changed. Here are the instructions to get VERDE 8.2.1 and 8.2.2(rpm) and Centos 7 installed. Burn Centos 7 Minimal to a CD/DVD or USB Install the OS Select your timezone ...Verde VDI Network Terms and Descriptions - NIC Teaming
Product Line: VERDE Introduction: The information contained within this document refers to the networking aspects of the VERDE VDI software solution being installed via a set of RPMs (program modules) on top of CentOS7. The following ...Required NIC Interface Naming Convention
Product Line: VERDE Specific to VERDE (rpm's), the Network Interface must be named the same across all VERDE servers. Installing with VERDE rpm's, CENTOS 7.x takes liberties and renames the NIC. Here are instructions on how to configure the name ...Choosing the Right VERDE Install Instructions with Postgres Database (Centos7)
Product Line: VEREDE As of VERDE 8.3.4, the database POSTGRES is used. The database is much more nimble and efficient. Due to the new database, there are design changes that need to be explained. If the customer plans to only install VERDE on one ...How to Team Two NICs Together on the VERDE Server/NIC Bonding
Product Line: VERDE VERDE version: 6.6 SP2/7.0 Host/Server: VERDEOS Guest/Image: N/A Client/Workstation: N/A Often, there is a call to bond two NICs on the VERDE Server. This can be performed within the VERDEOS Menu. After configuring a single ...